

How To Speed Up My Pc Windows 10
Although Windows 10 is a fast organisation (specially on modern hardware), at some point, the performance volition start degrading as a outcome of many factors, including compatibility issues and bugs, viruses or other types of malware, hardware problems, and more.
If you notice that your device is getting slower, information technology does not necessarily mean you lot take to supersede it immediately. A few simple software and hardware tweaks can significantly speed upward the Windows ten experience.
In this Windows x guide, we'll walk you through twenty means you tin try to speed up, optimize, and amend the functioning of your figurer – whether it has an older or modern hardware configuration.
- Restart device
- Disable startup apps
- Disable relaunch apps on startup
- Disable background apps
- Uninstall not-essential apps
- Install quality apps only
- Make clean up hard bulldoze infinite
- Use drive defragmentation
- Configure ReadyBoost
- Perform malware scan
- Install latest update
- Switch to high performance ability plan
- Disable organization visual furnishings
- Disable search indexing
- Increase page file size
- Restore previous working state
- Repair Windows setup files
- Reset device to mill defaults
- Upgrade to faster bulldoze
- Upgrade system memory
1. Restart device
Although information technology might be obvious, information technology's not the first affair that comes to everyone's listen, simply shutting down and restarting your device is amid the first things on the list yous want to exercise to better the overall experience.
When you close down or restart, the organization will close all the running applications and processes. And the data stored in memory will be cleared, which should help resolve the most common performance issues caused by keeping the operating arrangement running for a long time.
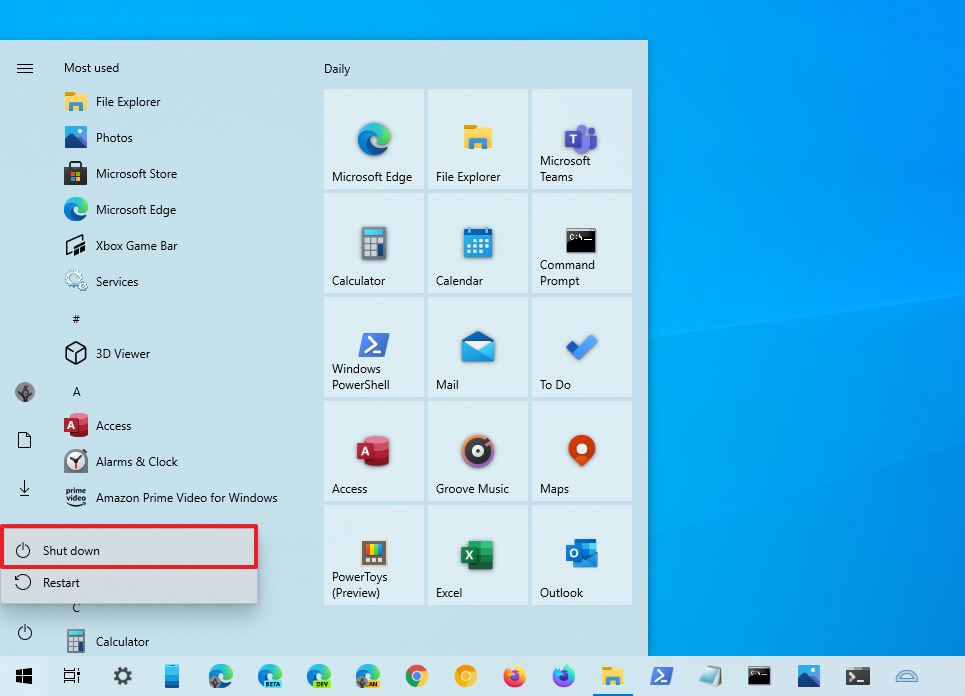
To shut down and restart the device, use these steps:
- Open Kickoff.
- Click the Power button.
-
Select the Shut down selection.
 Source: Windows Primal
 Quick tip: The "Sleep" or "Hide" options do not reset the system session or clear the data in memory.
- Press the power button to turn on the computer.

Afterward you consummate the steps, Windows 10 will start over again, and this time the performance should improve.
2. Disable startup apps
Many applications tin can configure themselves to beginning automatically during startup and continue to run in the background, wasting valuable arrangement resource that tin can significantly ho-hum down the experience.
If you lot want to speed upwards Windows x, you should disable all these applications running at startup or those you practise not apply regularly.
To disable apps at startup on Windows x, use these steps:
- Open Settings.
- Click on Apps.
- Click on Startup.
- Click the Sort by menu and select the Startup impact option.
-
Turn off the toggle switch for any unnecessary app (especially those marked as "Loftier impact" by the system).
 Source: Windows Cardinal
 - Restart your calculator.

Once you consummate the steps, the device should now start faster than before. Of class, the improvement gain will vary depending on the apps you disabled and hardware configuration.
3. Disable apps relaunch on startup
Windows 10 has a feature that can restart the apps from your last session after a reboot even before yous sign in. Although this is a useful feature that tin speed up the process to resume where yous left off speedily, it tin can too impact the organization operation.
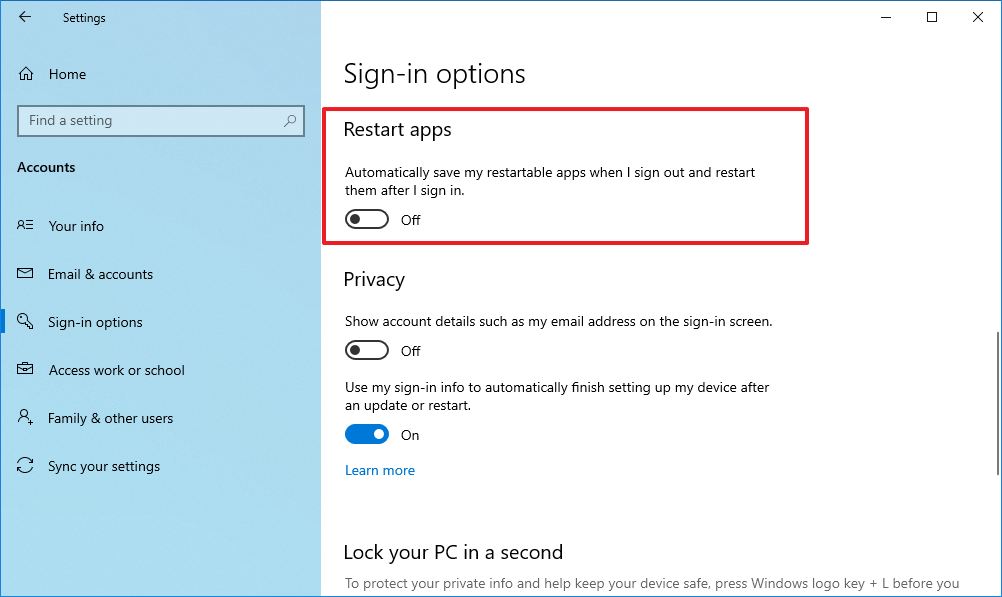
If the app re-launch at startup is enabled, you can disable it with these steps:
- Open Settings.
- Click on Accounts.
- Click on Sign-in options.
-
Nether the "Restart apps" section, turn off the toggle switch.
 Source: Windows Primal

After y'all consummate the steps, the apps y'all are using won't reopen during the side by side restart speeding up the overall arrangement performance.
4. Disable groundwork apps
On Windows 10, certain applications tin continue to run tasks in the background even when using them. If y'all desire to speed up your device equally much every bit possible, you can decide which apps can operate in the background or disable the characteristic to block all apps.
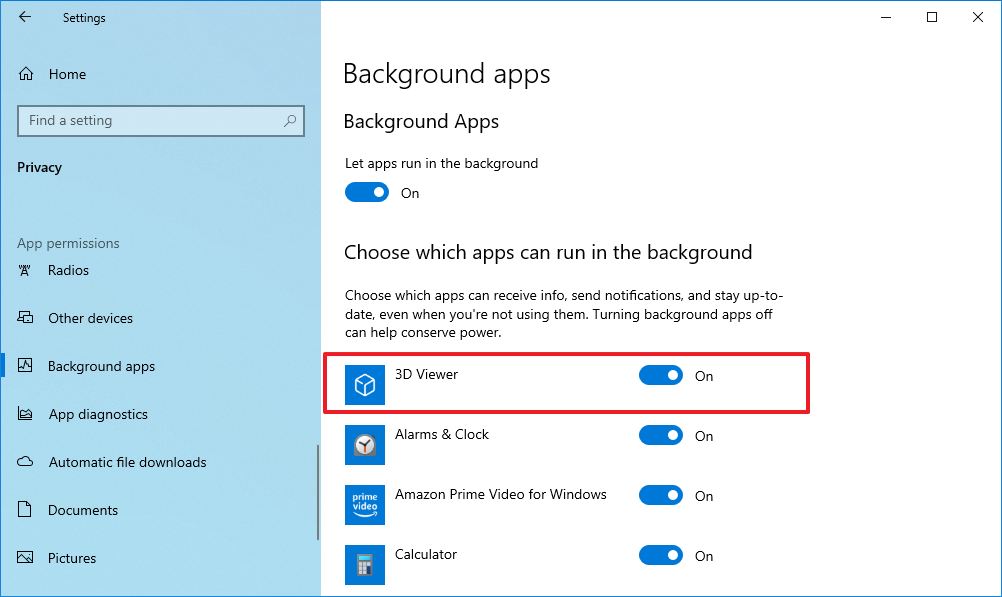
To terminate apps from running in the background, use these steps:
- Open Settings.
- Click on Privacy.
- Click on Groundwork apps.
-
Turn off the toggle switch for the apps you lot want to cease running in the background.
 Source: Windows Central
 - (Optional) Turn off the Let apps run in the background toggle switch to disable the feature for all modernistic apps (excluding win32 apps).

Once you lot complete the steps, apps will non waste material any more resources when you exercise not actively use them to increase system performance.
The option is just available for Microsoft Shop apps. If you have some traditional desktop apps that run in the background, you will need to modify the awarding settings.
v. Uninstall non-essential apps
Commonly, new devices come up bundled with many applications you do not demand, including the usual bloatware and system tools you will never use and will only waste matter space on the hard drive and resources. When you are trying to increase the arrangement performance, you lot should always remove those non-essential applications.
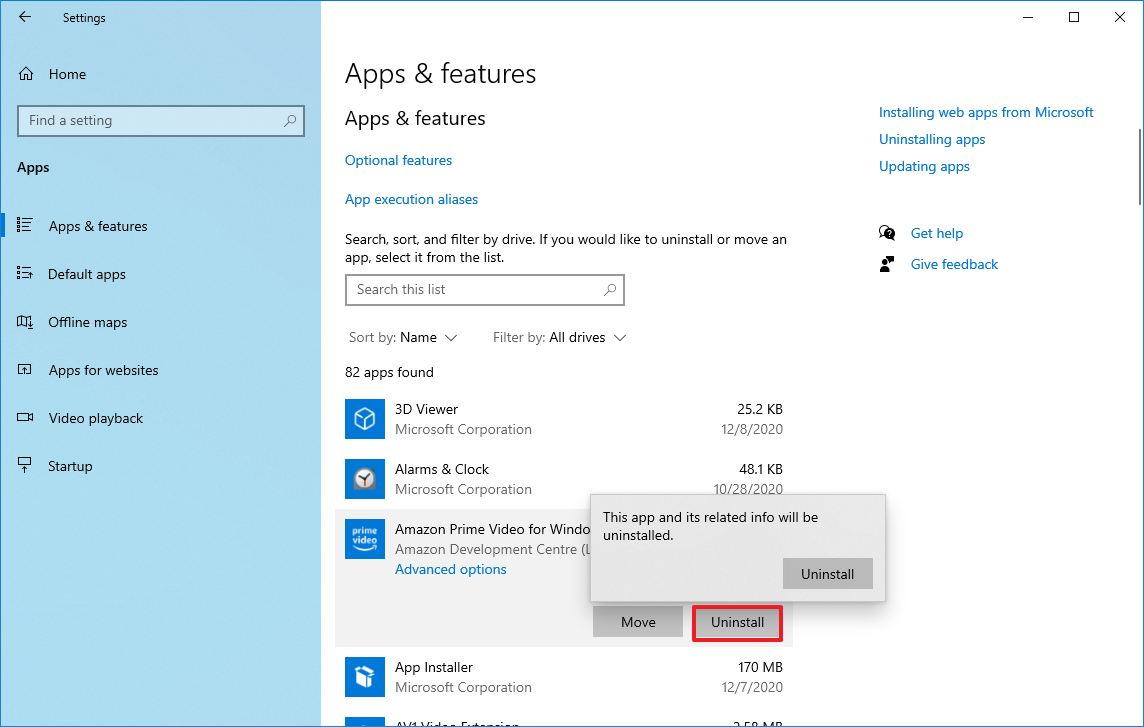
To uninstall non-essential apps on Windows 10, utilise these steps:
- Open Settings.
- Click on Apps.
- Click on Apps & features.
- Select the app to remove.
-
Click the Uninstall button.
 Source: Windows Cardinal
 - Click the Uninstall push button again. Or go on with on-screen directions to stop removing the app.

After y'all consummate the steps, you may demand to echo the instructions to uninstall other non-essential apps from the device.
6. Install quality apps simply
Here is a well-known piece of advice. Old and poorly designed apps and apps that load unnecessary features can negatively affect performance. Also, just because an app comes from a known company does not mean it's a good app.
If you desire to go along your device in a expert healthy and snappy, only install skilful apps. Typically, yous want to install apps available from the Microsoft Store, which accept been checked for security and performance. If the app is non bachelor through the shop, only download apps from trusted sources and confirm they were designed for Windows 10.
If you are non certain, yous can enquiry online to get more information about the app. For example, you can check the software vendor's forums to check whether users are experiencing issues or post a question in the forums to observe out more details.
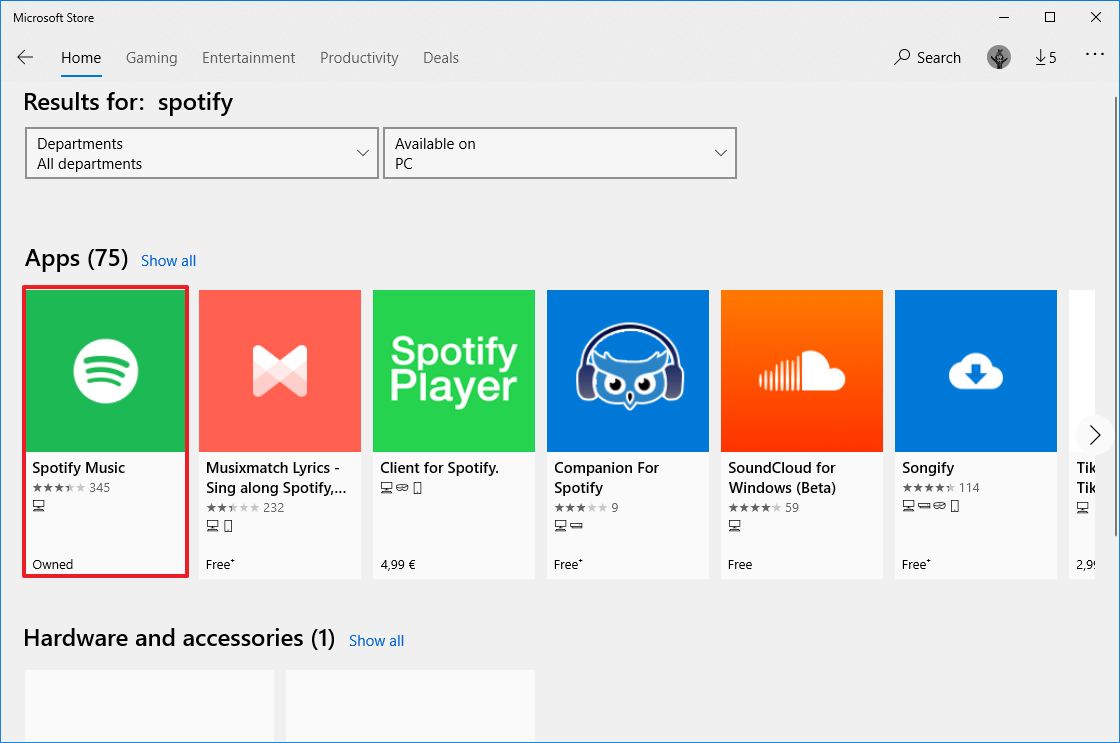
To install apps from the Microsoft Store, use these steps:
- Open up Microsoft Store.
- Use the searh box from the top-right corner to discover the app.
-
Select the app from the event.
 Source: Windows Central
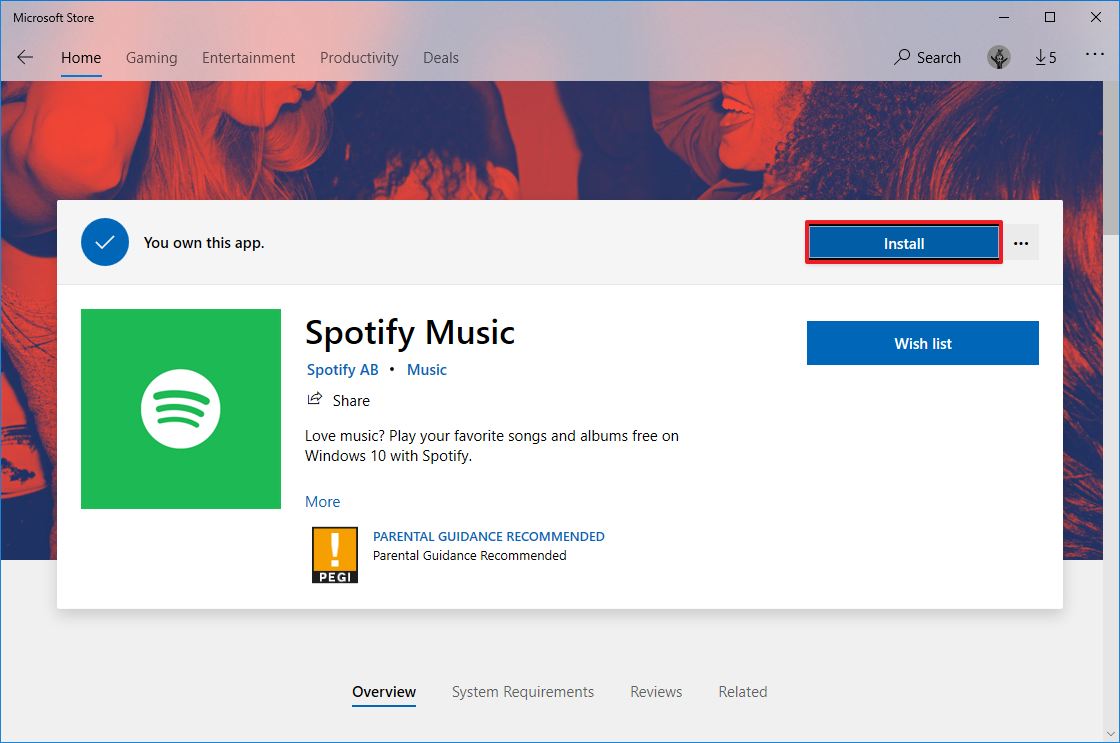
 -
Click the Go or Install push button.
 Source: Windows Central


Once you complete the steps, the app will install on your computer. If the app is not available in the Microsoft Shop, then download the installer from the trusted source, and follow the vendor support website step to install and configure the plan.
7. Clean upward hard bulldoze infinite
Whether it is a traditional Disk Hard Bulldoze (HDD) or Solid-Land Drive (SSD), information technology's never wise to employ a device with the hard drive most full considering it will bear on performance.
If the device has relatively new hardware and you notice apps, managing files, and other tasks are struggling to complete, it is likely because the bulldoze is running out of space. Typically, this becomes more evident after 70 percent of the total capacity has been used.
1 fashion to prevent the storage from impacting operation is to use Storage Sense to delete temporary and unnecessary files to reclaim space.
To free upward space with Storage Sense on Windows 10, use these steps:
- Open Settings.
- Click on System.
- Click on Storage.
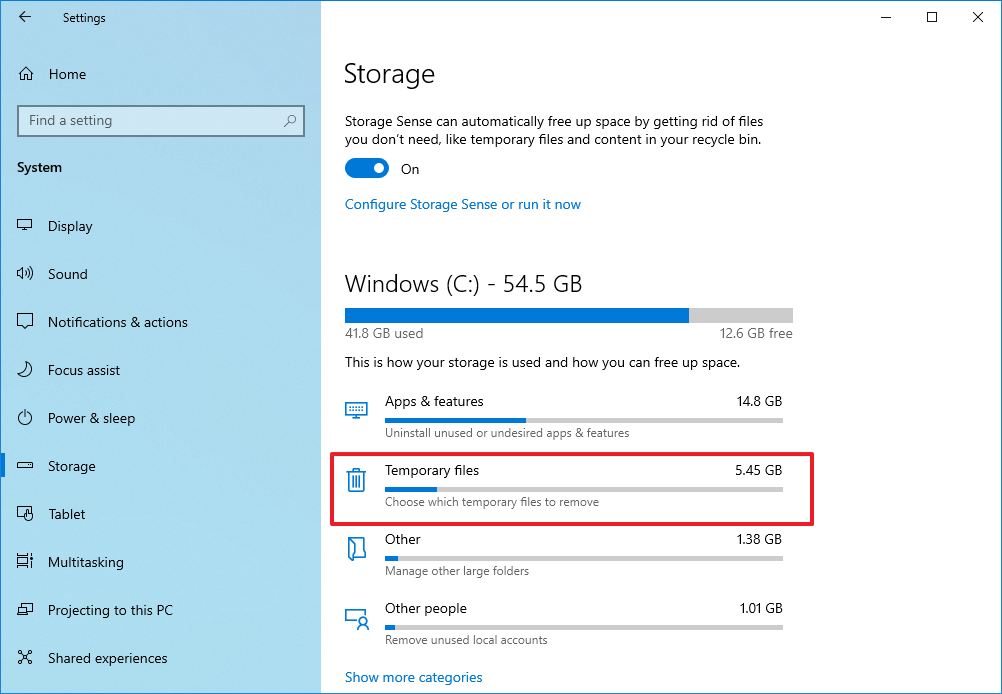
-
Nether the "Local Disk" department, click the Temporary files option. (If you do non run into the selection, click the Show more categories option to view the remaining items in the list.)
 Source: Windows Central
 -
Check the files you desire to delete to reclaim space and improve system performance.
Quick tip: When selecting the temporary files, call up that checking the Downloads option will delete everything within the "Downloads" folder. If yous desire to keep these files, practice non check this option. Likewise, you tin can select to delete the "Previous Windows Installation(s)" item (if applicable). Notwithstanding, one time you delete these files, you won't be able to ringlet dorsum to a previous version if you are having issues.
-
Click the Remove files push.
 Source: Windows Primal


Once yous complete the steps, if Storage Sense could reclaim enough space, the device'due south performance should be noticeably improved.
In improver to using Storage Sense, you can employ also OneDrive Files On-need characteristic to free up space. Y'all tin can use these instructions to fix up Files On-demand on your device.
If you could non repossess plenty space, employ this guide to observe more than means to optimize the storage.
eight. Use drive defragmentation
If you have a device with older hardware with a traditional rotating platters difficult bulldoze, organizing the data can increase the auto's responsiveness.
To run the defragmentation tool, use these steps:
- Open Settings.
- Click on Arrangement.
- Click on Storage.
-
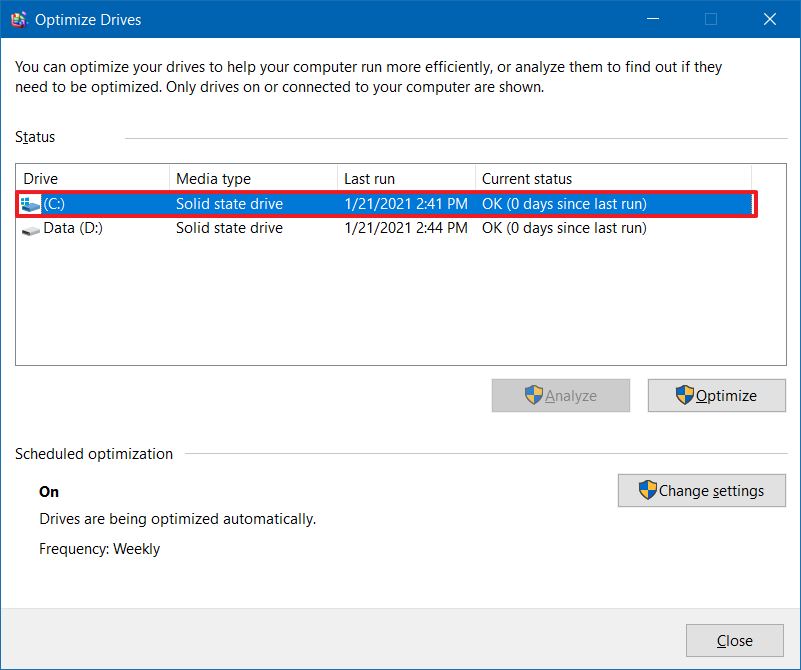
Under the "More storage settings" section, click the Optimize Drives option.
 Source: Windows Central
 - Select the drive that needs defragmentation.
-
Click the Optimize button.
 Source: Windows Key


After you complete the steps, the utility will rearrange the files to brand them attainable more than quickly the next time they are needed, translating into noticeable performance comeback. The just caveat is that the process tin can accept a long time depending on the amount of information stored on the bulldoze. (If you have an older system, it is best to leave the procedure running overnight.)
If you have a device with an SSD, using the defragmentation tool will run the trim command to inform the storage device of the blocks with data that can exist safely erased. This procedure tin significantly better performance because the drive won't have to erase the blocks during the writing data process.
ix. Configure ReadyBoost
In improver, to utilise the defragmentation tool on devices with older hardware, you can also utilise the ReadyBoost characteristic to speed upward your figurer.
ReadyBoost is non new to Windows 10, it's been effectually for many years, and it is a feature that uses a flash bulldoze or SD menu to cache files to heave the overall organization performance. (If the device has an SSD, this characteristic won't be available since it is unlikely to offer additional benefits.)
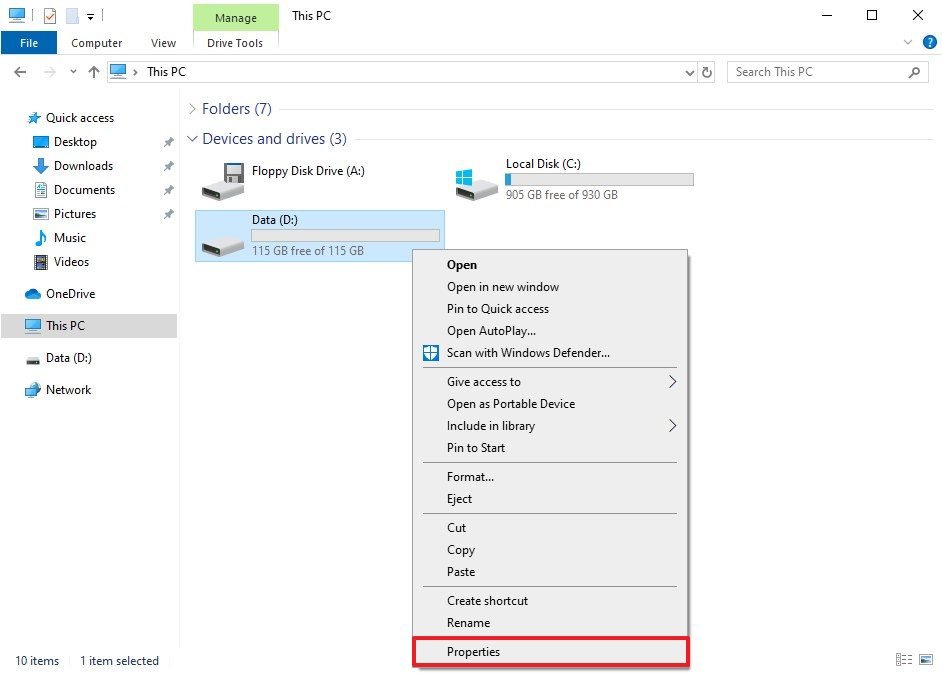
To enable ReadyBoost on Windows x, connect a USB flash drive, and use these steps:
- Open File Explorer.
- Click on "This PC" from the left pane.
-
Under the "Devices and drives" section, right-click the USB flash bulldoze and select the Properties selection.
 Source: Windows Central
 - Click on the ReadyBoost tab.
-
Select the Dedicate this device to ReadyBoost choice.
 Source: Windows Central
 - Click the Apply push button.
- Click the OK push button.


Once you complete the steps, the removable bulldoze should help to heave the performance of the computer.
If you lot need a USB flash drive to apply with ReadyBoost, we recommend the SanDisk Extreme Go because of its storage capacity, reliability, and price.
10. Perform malware browse
When a device starts to operate deadening, this could be a sign of a malware infection. Usually, viruses, spyware, and other malware types are known to have upward many system resources making a device unusable.
Although Windows 10 comes with Microsoft Defender Antivirus, it does not guarantee that malware will make its way into the system. If you suspect the computer has been infected, you lot should try running a full virus scan.
To run a full virus browse on Windows 10, use these steps:
- Open Get-go.
- Search for Windows Security and click the pinnacle effect to open up the app.
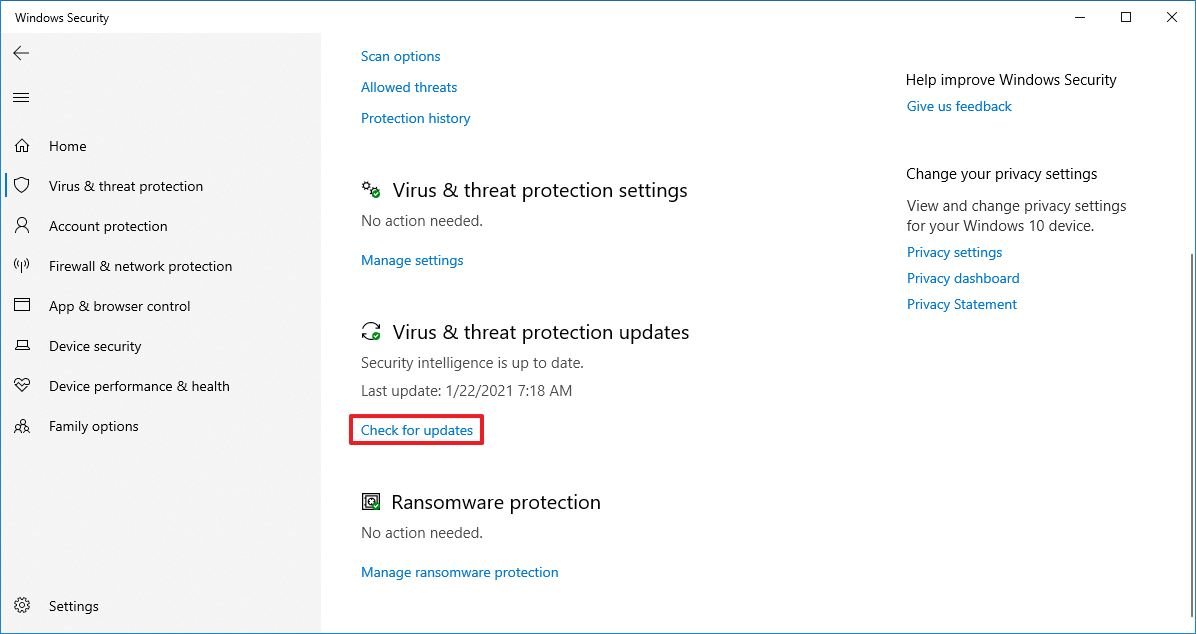
- Click on Virus & threat protection.
-
Nether the "Virus & threat protection updates" section, click the Check for updates option.
 Source: Windows Primal
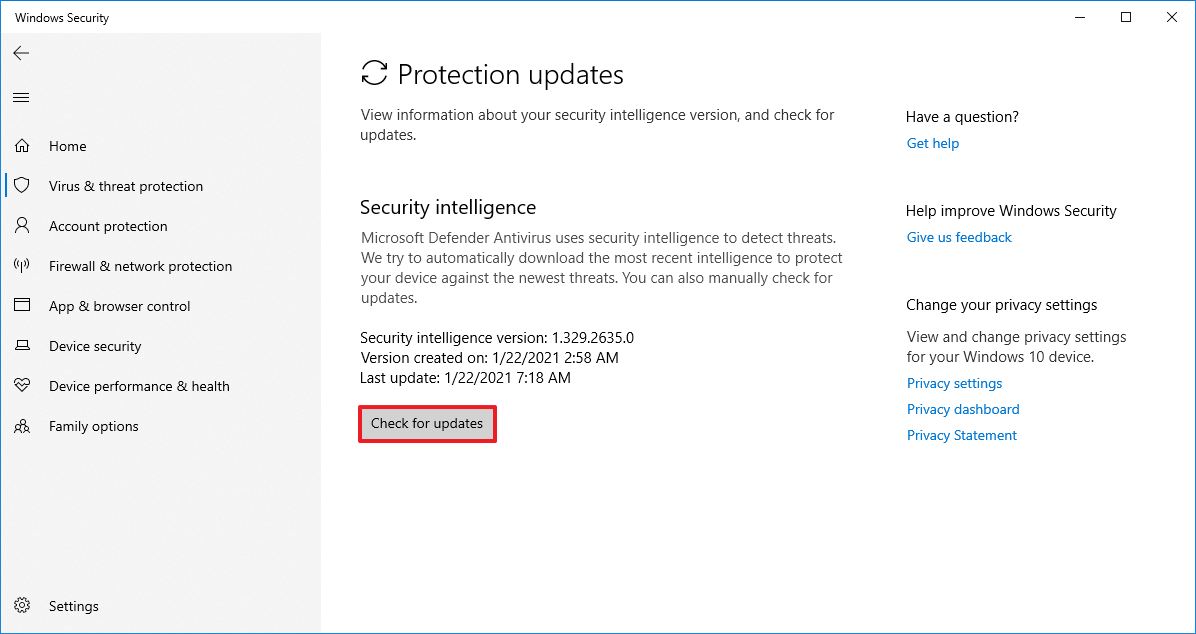
 -
Click the Check for updates button.
 Source: Windows Central
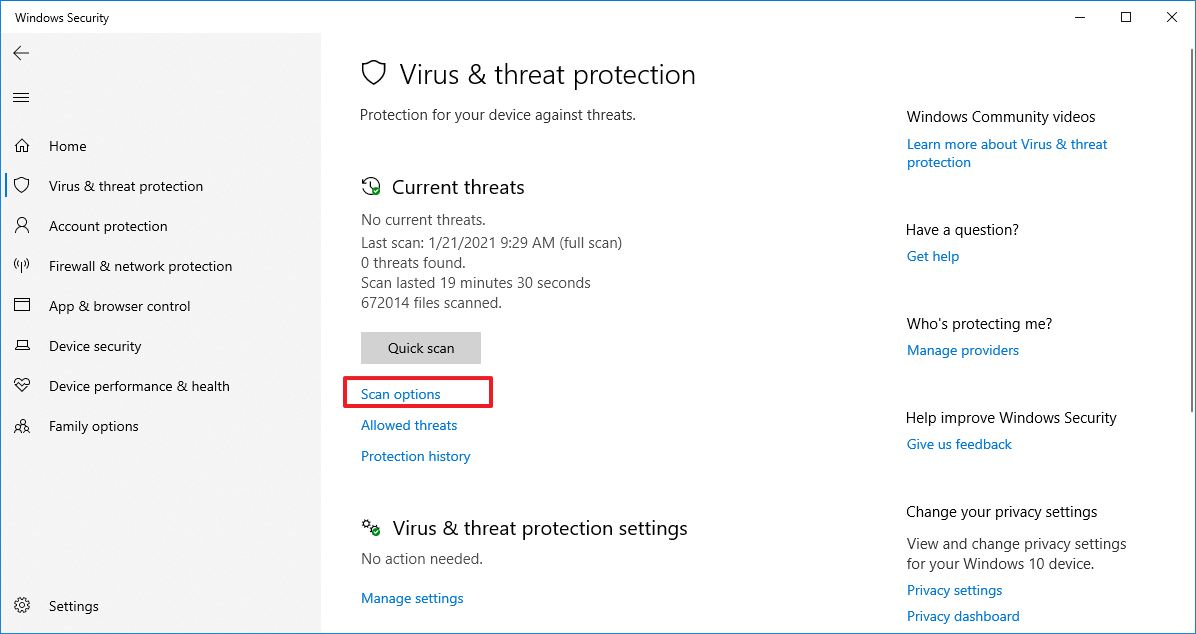
 - Click on Virus & threat protection from the left pane.
-
Under the "Current threats" section, click the Scan options option.
 Source: Windows Fundamental
 -
Select the Full scan selection.
 Source: Windows Fundamental
 - Click the Scan now push button.


After you complete the steps, Microsoft Defender Antivirus should detect and remove whatever malware impacting performance.
Microsoft Defender Offline browse
If you cannot use Microsoft Defender Antivirus because it's not running, the definition does not update, or at that place are problems completing a scan, the device is likely infected with complex malware that cannot be removed while the Os is running. If this is the case, the antivirus includes an selection to perform an offline scan.
To consummate a Microsoft Defender Antivirus offline scan, use these steps:
- Open Start.
- Search for Windows Security and click the top result to open the app.
- Click on Virus & threat protection.
-
Nether the "Current threats" section, click the Scan options option.
Source: Windows Central -
Select the Microsoft Defender Offline scan pick.
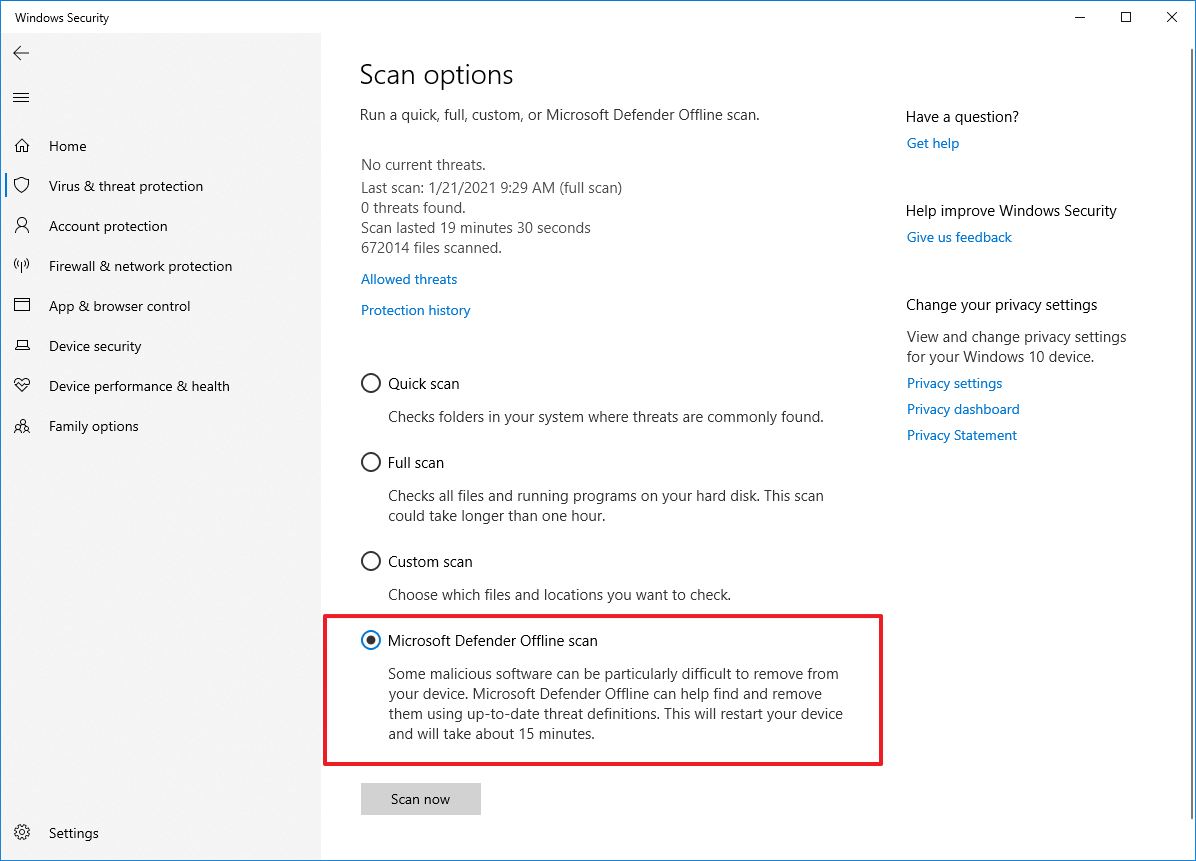 Source: Windows Central
 - Click the Scan now button.

Once y'all complete the steps, the system will restart automatically into the offline experience of Microsoft Defender, and it will perform a scan to detect and remove whatever threats that could not be removed while Windows 10 was running.
If you use other antimalware solutions like Malwarebytes, Bitdefender, Trend Micro, or Norton, cheque their back up documentation to remove viruses and other malicious programs.
11. Install latest update
Microsoft is always proactively releasing updates to ready problems, add new features, and patch security vulnerabilities. While sometimes updates are the reason for things not working correctly, maintaining the update tin speed up your estimator.
Install cumulative updates
On Windows 10, updates happen automatically, but depending on the update or how the device is configured, they don't ever download and install as soon every bit they become available. If your calculator is running slower than usual, it could be possible that an update is bachelor to improve performance.
To install updates manually on Windows 10, use these steps:
- Open up Settings.
- Click on Update & Security.
- Click on Windows Update.
-
Click the Bank check for updates button.
 Source: Windows Central
 - (Optional) Nether the "Optional updates bachelor" section, click the Download and install now option if there'south a cumulative update available.
- Click the Restart now push.

After y'all consummate the steps, the new update should help to improve system performance.
Upgrade to latest version
If the device has an older release of Windows 10, upgrading to the most recent version tin can speed upward the performance or introduce new features that could make you more productive to go piece of work done faster.
To bring a Windows x device to the most recent version, apply these steps:
- Open up Settings.
- Click on Update & Security.
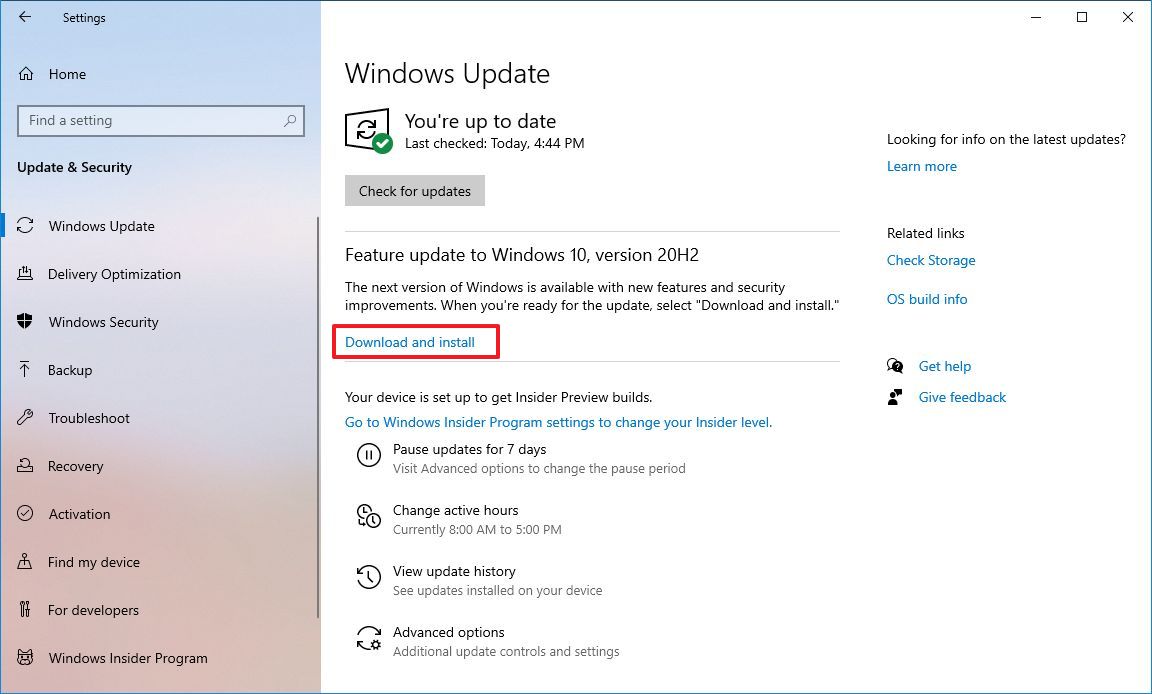
- Click on Windows Update.
-
Click the Cheque for updates push.
 Source: Windows Central
 - Under the "Feature Update" section, click the Download and install at present choice if a new version is available. (If the option is not bachelor, the computer already has the most recent version installed, or the new version is not still fully compatible with your hardware configuration.)
- Click the Restart now button.

Once you complete the steps, the computer will restart to apply the new version, improving the overall system performance.
Update device drivers
If your computer is running slow because of a compatibility issue or a poorly designed driver, you may be able to resolve the performance issue past downloading and installing the most stable or pre-release version of the driver available from the manufacturer back up website manually.
Before proceeding, you need to download the latest available commuter package from your device manufacturer website, uncompress the files using the self-extracting or .aught extension file, then use these steps:
Quick notation: Whenever possible, it is recommended to use the manufacturer back up website instructions to complete this job. If instructions are not available, then you can refer to the steps below.
- Open Starting time.
- Search for Device Manager and click the top outcome to open up the app.
- Expand the co-operative for the device driver causing bug. For instance, Display adapters to update the video driver.
-
Right-click the device and select the Update driver selection.
 Source: Windows Central
 -
Click the Browse my estimator for driver software pick.
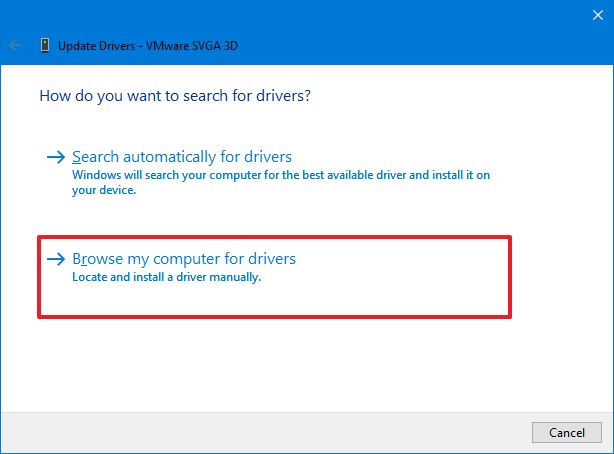 Source: Windows Key
 -
Under the "Search for drivers in this location" section, click the Browse button.
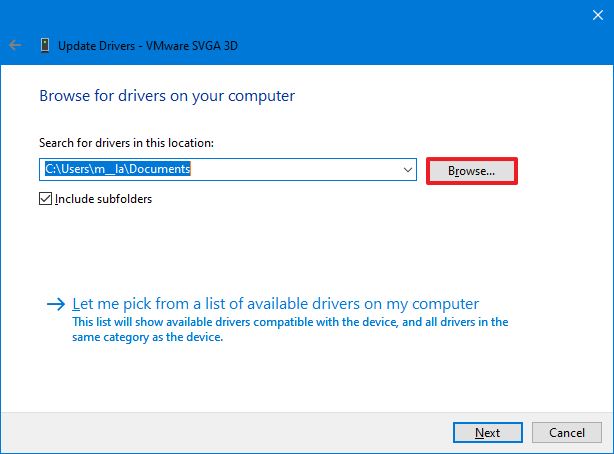 Source: Windows Central
 - Select the folder with the device driver installation files.
- Click the OK button.
- Click the Adjacent push.
- Click the Close button.


After you complete the steps, the new version of the driver will install to address compatibility or any other problems impacting the system and boosting performance.
On Windows ten, there are multiple means to update device drivers. If you need boosted help, y'all can use this guide that outlines different methods to update a driver manually.
Update applications
Outdated apps tin slow down a computer, and usually, this is due to bugs or compatibility problems with a new version of Windows 10.
While apps you install from the Microsoft Store tin can update automatically, many traditional desktop apps demand to be updated manually. If you take an app causing operation bug, you should bank check your software support website for a newer update and the instructions to install it.
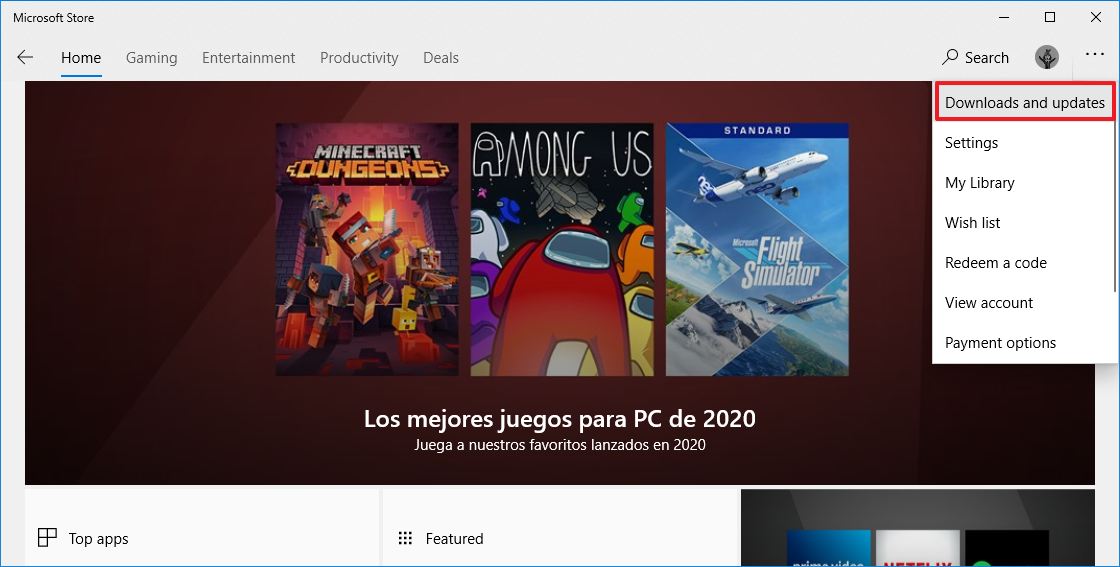
To update Microsoft Store apps manually, use these steps:
- Open Microsoft Store.
- Click the Run into more (ellipsis) button from the superlative-right corner.
-
Select the Downloads and updates option.
 Source: Windows Central
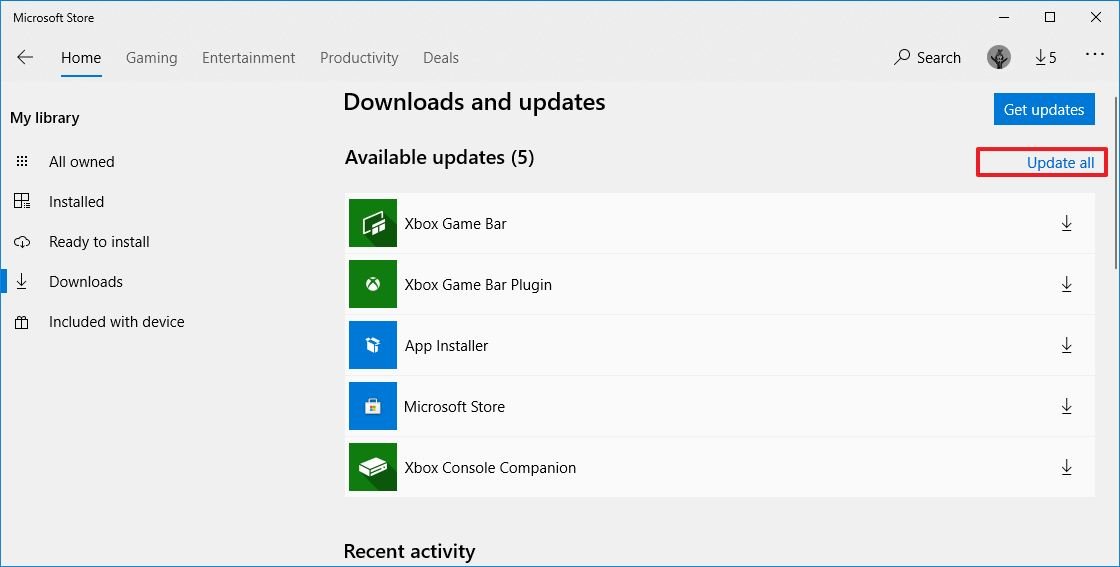
 - Click the Get updates button.
-
Click the Update all option
 Source: Windows Primal


In one case you complete the steps, if updates are bachelor, they will download and install automatically.
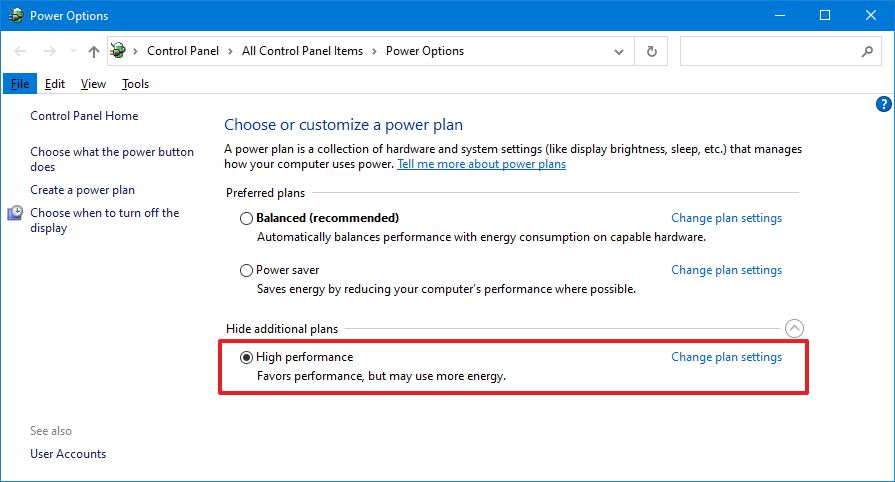
12. Switch to high performance ability plan
Windows ten includes unlike plans (Balanced, Power saver, and High functioning) to optimize the power usage. If y'all want to boost the system performance, utilise the "High performance" option since information technology allows the device to employ more power to operate faster.
To select a new power program on Windows 10, employ these steps:
- Open up Settings.
- Click on Power & sleep.
-
Under the "Related settings" department, click the Additional ability settings option.
 Source: Windows Fundamental
 - Click the Show additional plans option (if applicable).
-
Select the High-performance power plan.
 Source: Windows Key


If the ability plan is non bachelor, you may need to create a custom ability plan to improve operation using the "Loftier performance" settings.
On laptops, yous tin can also change the "Ability mode" to increase performance past borer or clicking the battery icon in the taskbar's notification area and selecting the All-time operation choice using the slider.
13. Disable organization visual effects
On Windows x, you will notice many visual effects from animations to shadows to more avant-garde visuals elements, such as blur and transparency, reveal highlight, and part of the Fluent Design language.
Although these effects tin brand the feel more visually appealing, they also crave system resources that tin slow downwards computers with older hardware. Notwithstanding, you lot can disable these effects to save resources and brand Windows 10 seem a petty faster.
Disable visual furnishings
To disable animations, shadows, smoothen fonts, and other effects on Windows 10, use these steps:
- Open Settings.
- Click on System.
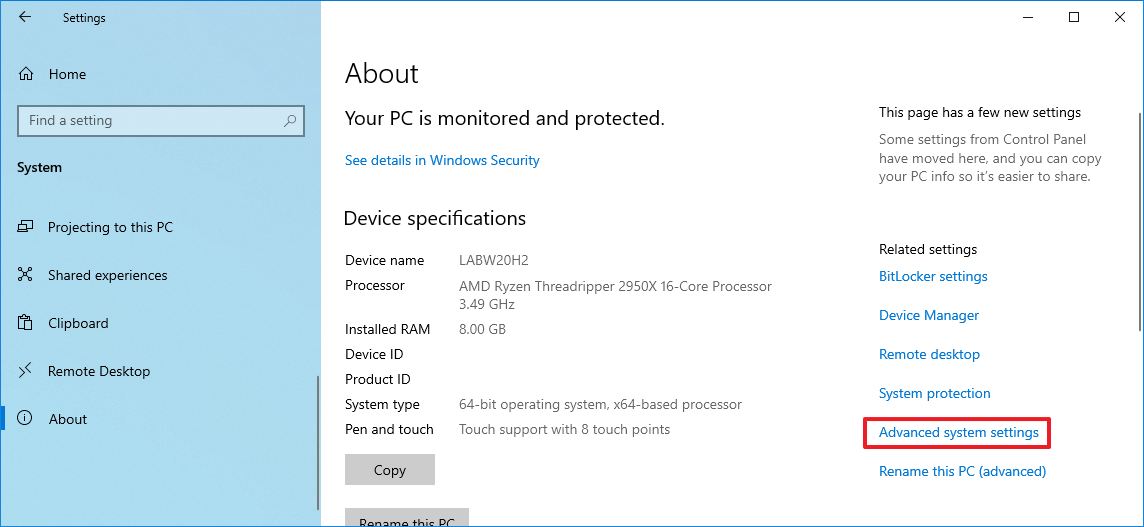
- Click on Well-nigh.
-
Nether the "Related settings" department, click the Advanced system settings choice from the right pane.
 Source: Windows Central
 - Click the Advanced tab.
-
Nether the "Functioning" section, click the Settings button.
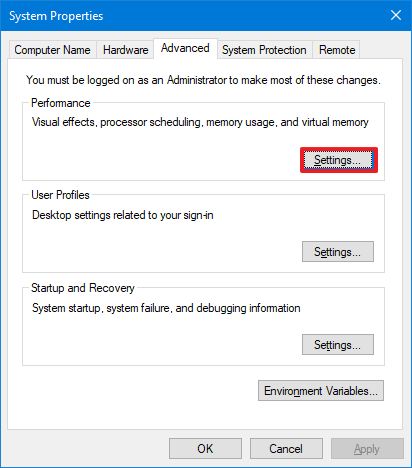 Source: Windows Central
 - Click the Visual Furnishings tab.
-
Select the Adapt for best performance selection to disable all the effects and animations.
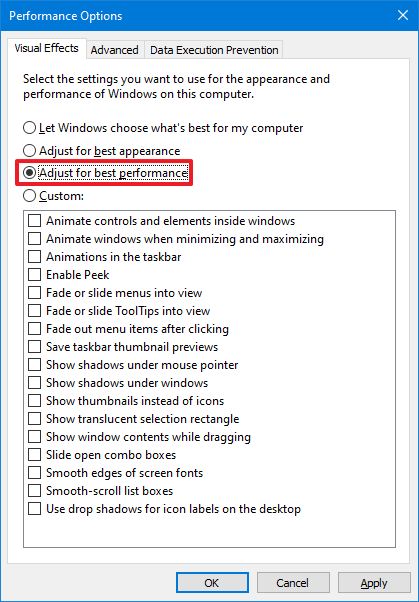 Source: Windows Cardinal
 Quick tip: Using this selection will also affect the fashion fonts are rendered. If y'all desire to keep fonts crisp and more readable, select the Custom option, clear all the settings, but exit the Shine edges of screen fonts option checked.
- Click the Use button.
- Click the OK push.


Once you complete the steps, the visual effects volition disable, and interacting with elements (windows and menus) will experience more responsive.
Disable transparency effects
To speed upwardly Windows 10 disabling Fluent Design effects, use these steps:
- Open Settings.
- Click on Personalization.
- Click on Colors.
-
Turn off the Transparency furnishings toggle switch.
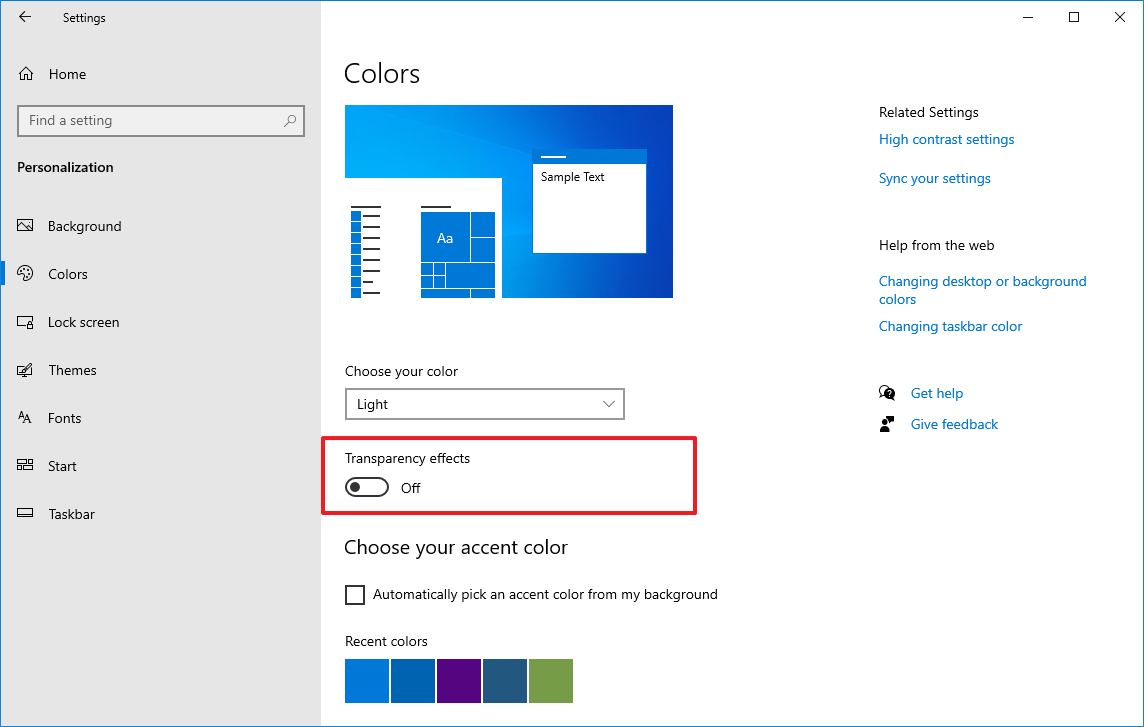 Source: Windows Key

After you lot complete the steps, Windows 10 volition not only feel faster, but your device will gratuitous up some organization resource for more important tasks.
14. Disable search indexing
Although Windows 10 search is an important characteristic to find apps, settings, and files, the indexing process can sometimes consume many resources that can negatively impact the experience – especially on low-finish devices. If yous proceed your files organized, y'all can irksome down the indexing process by excluding all search locations.
To configure the indexer to better organization performance on Windows 10, use these steps:
- Open up Settings.
- Click on Search.
- Click on Search Windows.
-
Under the "More Search Indexer Settings" department, click the Advanced Search Indexer Settings pick.
 Source: Windows Central
 -
Click the Change button.
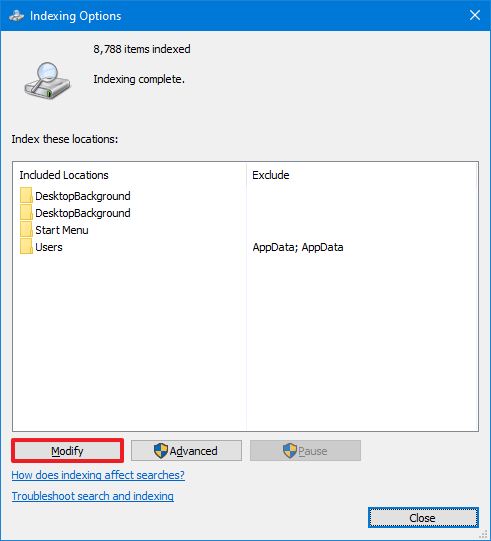 Source: Windows Central
 -
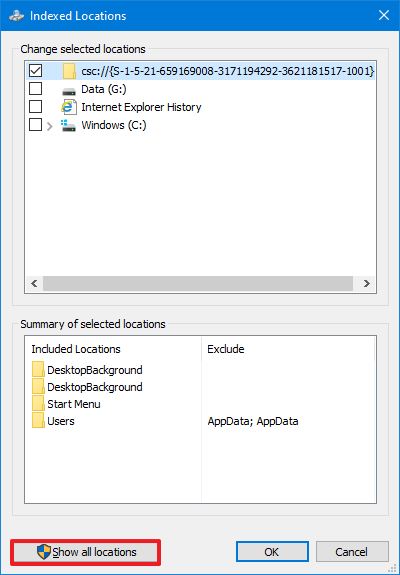
Click the Show all locations button.
 Source: Windows Central
 -
Under the "Modify selected locations" section, clear all the selected locations.
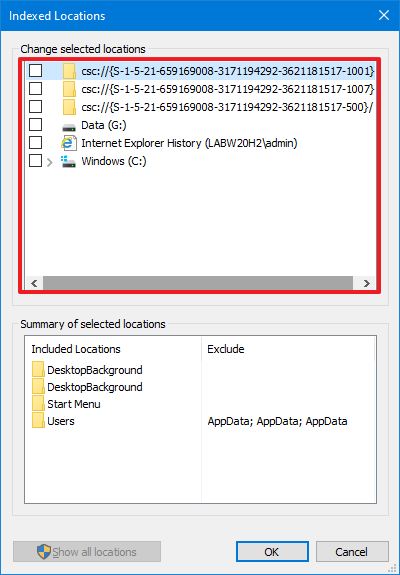 Source: Windows Central
 - Click the OK push.
- Click the Close button.


Once you complete the steps, Windows Search will keep to run on your device, but Windows x will no longer index the specified locations, which should ameliorate the overall performance.
15. Increase page file size
On Windows ten, the "folio file" is a subconscious file on the hard drive that works as retentiveness, and it acts every bit an overflow of the arrangement retentiveness, which holds data for apps currently running on the device.
If you increase the size of the paging file, it can aid to boost organisation functioning.
To alter the page file to increase functioning, use these steps:
- Open Settings.
- Click on Arrangement.
- Click on About.
-
Under the "Related settings" department, click the Advanced system settings pick.
Source: Windows Central - Click the Avant-garde tab.
-
Under the "Functioning" section, click the Settings button.
Source: Windows Key - Click the Advanced tab.
-
Under the "Virtual memory" section, click the Change push button.
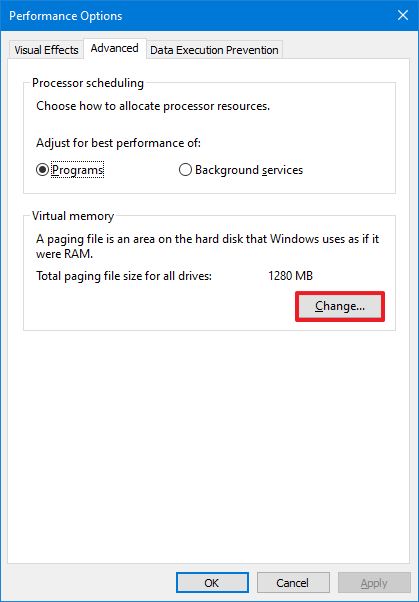 Source: Windows Central
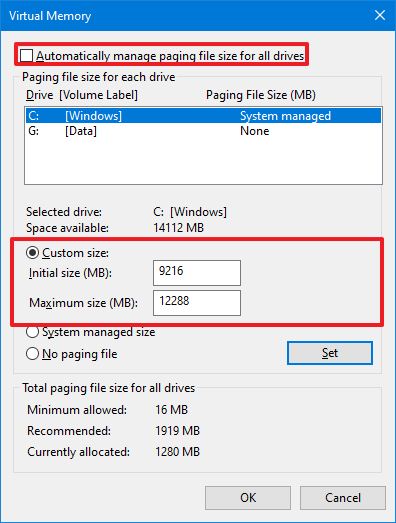
 - Clear the Automatically manage paging files size for all drives pick.
- Select the Custom size selection.
-
Specify the initial and maximum size for the paging file in megabytes.
 Source: Windows Central
 Quick tip: Typically, it is recommended to use a number i and a half times the full available memory for the "Initial size" and 3 times of available memory for the "Maximum size" when possible. You can ostend the total amount of memory bachelor on the Almost settings folio.
- Click the Prepare button.
- Click the OK button.
- Click the OK button again.
- Restart your figurer.


After you lot consummate the steps, the device will restart, and you should then detect a boost in functioning while using apps. The operation will be more noticeable when configuring the folio file in a Solid-Country Bulldoze.
If the new settings are causing issues or functioning does not better, you can e'er revert the changes with the aforementioned instructions outlined higher up. Yet, on pace No. 9, make certain to select the System managed size pick and check the Automatically manage paging files size for all drives pick.
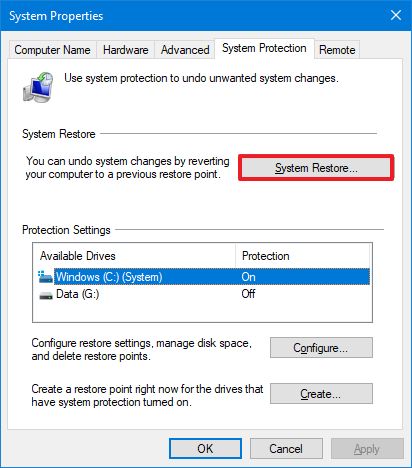
sixteen. Restore previous working state
Sometimes your reckoner volition begin to slow down after installing a new system update, device driver, or awarding. If you cannot determine why the device is boring, y'all can undo any changes by restoring the previous working country using a Organization Restore point.
To apply a restore signal to fix performance problems on Windows 10, use these steps:
- Open Commencement.
- Search for Create a restore point and click the tiptop upshot to open the System Properties app.
- Click the System Protection tab.
-
Click the Organisation Restore button.
 Source: Windows Central
 - Click the Next button.
-
Select the most recent restore bespeak to resolve the performance result.
 Source: Windows Central
 - Click the Scan for affected programs push to place the apps that will be removed if they were installed after the restore point was created.
- Click the Close push.
- Click the Next button.
- Click the Finish button.


Once you consummate the steps, the computer will roll dorsum to a previous country bringing back when performance was not an issue.
When applying a restore point, your files will be preserved, just the process volition remove organisation changes, updates, drivers, and applications installed later on the restore bespeak was created.
Arrangement Restore is not enabled by default. This means yous must set it upwardly before you can revert arrangement changes.
17. Repair Windows setup files
If the device shows signs of functioning issues, it could be due to corrupted system files. If this is the case, you lot can use the Deployment Paradigm Service and Management Tool (DISM) and System File Checker (SFC) command-line tools to fix the setup without reinstallation.
Ready installation files with DISM
To utilize DISM to repair corrupted system files to improve operation and stability on Windows 10, utilize these steps:
- Open Offset.
- Search for Command Prompt, right-click the meridian event, and click the Run as Administrator option.
-
Blazon the post-obit command to repair the installation and press Enter:
DISM /Online /Cleanup-image /Restorehealth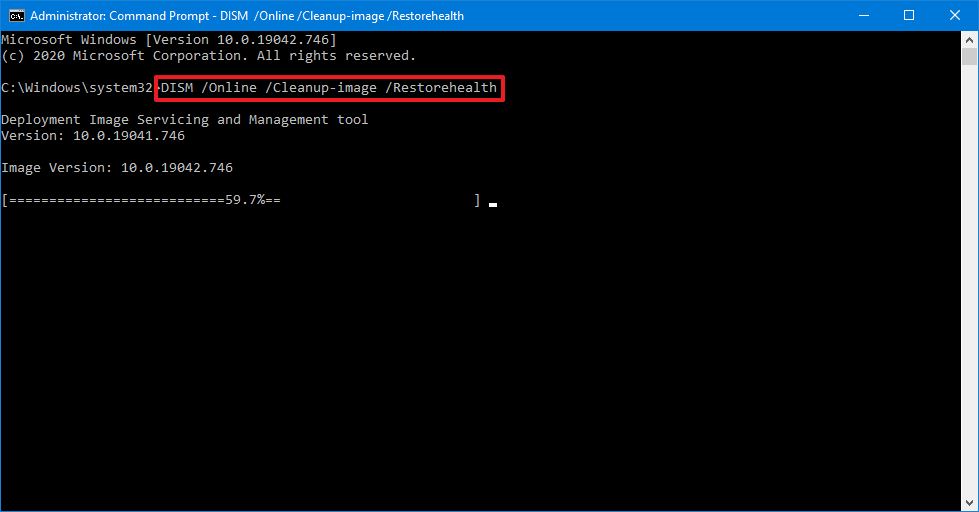 Source: Windows Central

Later yous consummate the steps, the device should at present operate ordinarily if the utility is finished successfully. If the scan had bug, then you should also use the SFC command-line tool. (You tin can always learn more most this characteristic in our DISM walkthrough guide.)
Fix installation files with SFC
To apply SFC to repair corrupted system files, use these steps:
- Open up Kickoff.
- Search for Command Prompt, right-click the top result, and click the Run as Administrator choice.
-
Type the post-obit control to repair the installation and press Enter:
sfc /scannow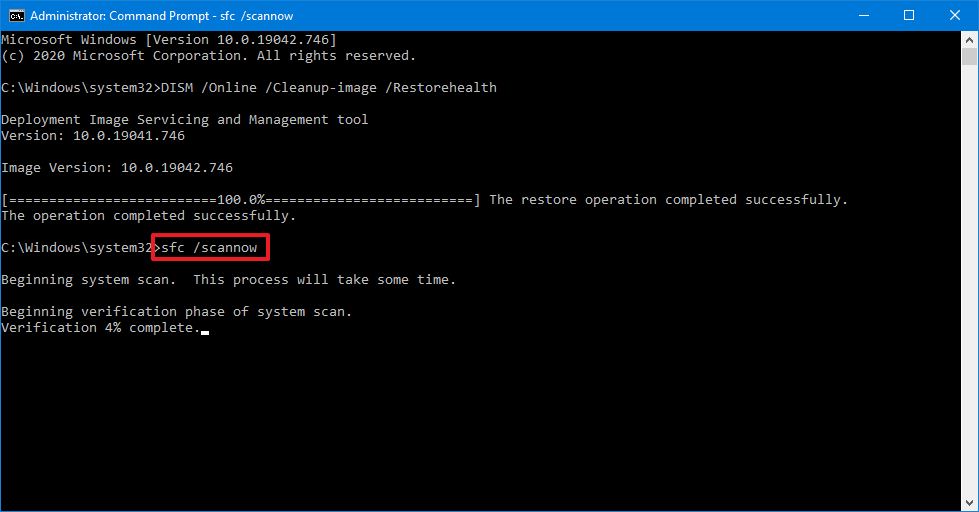 Source: Windows Key

Once you complete the steps, the tool should be able to fix any problem affecting performance.
Y'all can check this guide with more details on using the System File Checker tool, including the steps to view scan details, repair individual files, and perform an offline system repair.
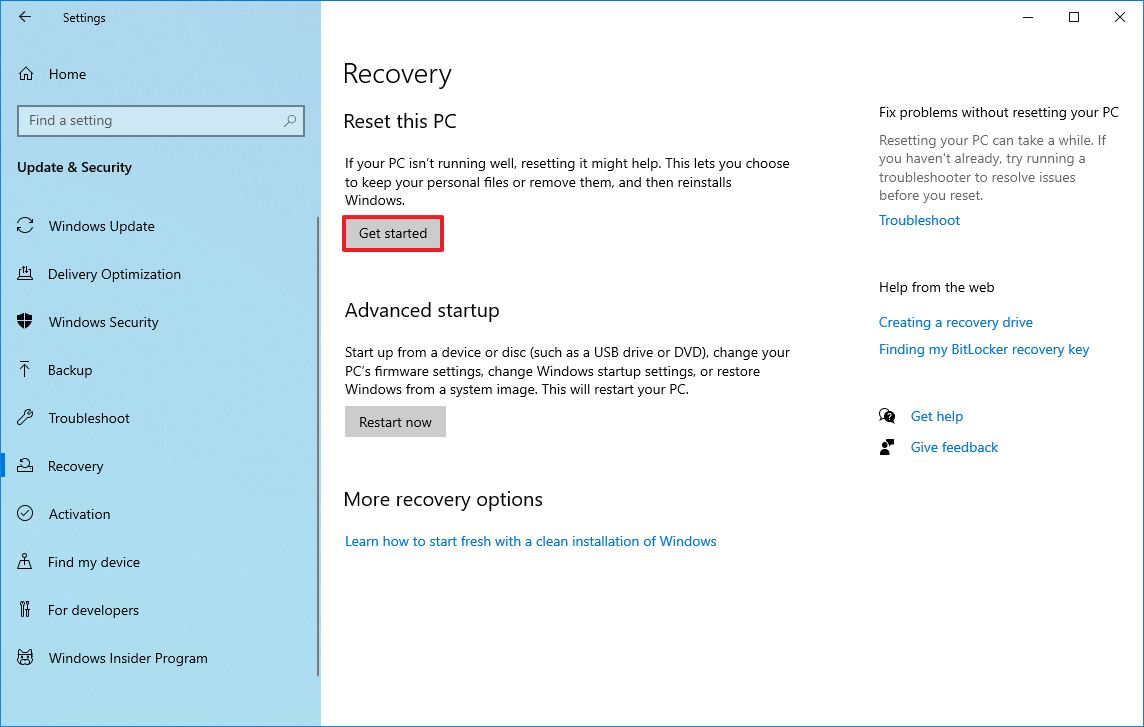
18. Reset device to factory defaults
Alternatively, yous can as well reset the computer to the manufacturing plant default settings to outset fresh with a clean copy of Windows 10 to improve startup and shutdown, battery life, and overall system operation.
Warning: If you choose to erase your files, you should consider creating a full fill-in or make a copy of your files to an external bulldoze before proceeding.
To reset a device to its default settings, utilise these steps:
- Open Settings.
- Click on Update & Security.
- Click on Recovery.
-
Under the "Reset this PC" section, click the Get started button.
 Source: Windows Fundamental
 -
Click the Keep my files button. (You can as well click the Remove everything button to erase everything and install a clean copy of Windows ten.)
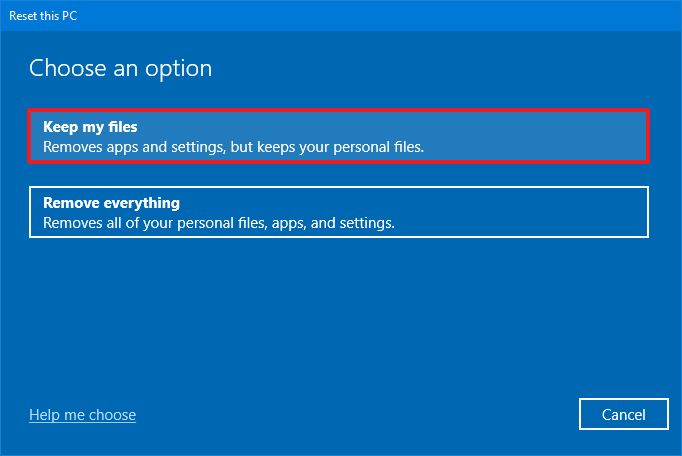 Source: Windows Cardinal
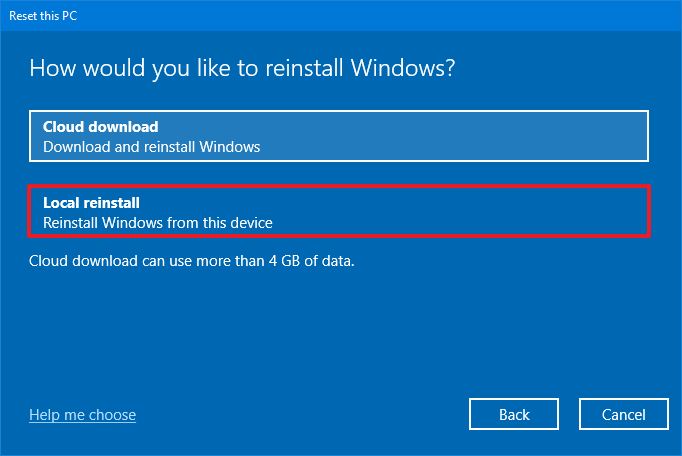
 -
Select the Local reisntall pick.
 Source: Windows Central
 Quick tip: If you desire a make clean installation of Windows ten without the apps that came pre-installed with the device or if the Local reinstall option does not work, select the Cloud download option.
- Click the Side by side button push button.
-
Click the Reset button.
 Source: Windows Key


After you complete the steps, Windows 10 volition be reinstalled, removing previous configurations, settings, and apps to help you boost organization performance. If you lot selected the option to remove everything, call back to restore your files from a previous backup after the process.
If you are looking to install Windows 10 from scratch, check out our in-depth guide to perform a clean installation.
19. Upgrade to faster drive
If, fifty-fifty after going through the reset procedure, you are non noticing performance improvements, then it might be time to upgrade the difficult bulldoze to an SSD.
Upgrading to a Solid-Land Drive is maybe one of the best ways to increase functioning on older hardware. Ordinarily, it's because SSDs exercise non have moving parts similar traditional hard drives, which means data can exist read and written a lot faster.
When you replace an HDD with an SSD, Windows 10 will boots noticeable faster, apps will launch and run quicker, and the overall performance will be snappier and faster.
If you lot programme to upgrade to an SSD, we recommend the Samsung 860 EVO considering of its fast performance, reliability, and five-year warranty.
20. Upgrade system retention
Insufficient system memory can too exist why your desktop or laptop is running wearisome, specially if you work with multiple apps and many open tabs in the web browser.
If y'all desire to determine whether your reckoner needs more memory, you first demand to find out the total amount of retention installed on the device and how the system is using it.
To view the total amount and electric current memory usage, utilize these steps:
- Open Start.
- Search for Task Manager, and click the top result to open the app.
- Click the Operation tab.
- Click on Retention from the left pane.
-
On the right, check the total amount of RAM in the top-right corner, and in the lesser-left corner, nether "In use (Compressed)," you can discover the out total amount of memory currently in employ.
 Source: Windows Central

If the total amount of "in employ" retentiveness is constantly high (around 80 pct), and so it's time to add together memory sticks.
Although the process to add more memory is relatively straightforward, finding a uniform kit can be tricky. Always remember to use Task Director to find out the type of memory you need and if there are any slots available. Information technology is also recommended to check your device manufacturer's website to observe more than specific information well-nigh the memory requirements.
More Windows 10 resources
For more helpful articles, coverage, and answers to common questions about Windows ten, visit the following resources:
- Windows 10 on Windows Key – All you need to know
- Windows 10 aid, tips, and tricks
- Windows ten forums on Windows Central
We may earn a commission for purchases using our links. Larn more than.

Buyer's guide
The Dell XPS 15 is our choice for all-time 15-inch laptop
For a lot of people, a 15-inch laptop is a perfect size that offers enough screen for multitasking, and in a lot of cases, some extra performance from powerful hardware. We've rounded upwardly the best of the best at this size.

Kill the suspense
Mojang Studios needs to come up clean virtually Minecraft on Xbox Series X|S
Minecraft players have been eagerly awaiting a "current-gen" upgrade for Minecraft on Xbox Series Ten|S since the consoles launched, specially for the possibility of ray tracing. Subsequently the recent mishap with mistakenly released prototype code, it's fourth dimension for Mojang Studios to come clean. What's going on?

How To Speed Up My Pc Windows 10,
Source: https://www.windowscentral.com/tips-tricks-increase-pc-performance-windows-10
Posted by: wilkinablempoore.blogspot.com
0 Response to "How To Speed Up My Pc Windows 10"
Post a Comment